Fans, friends and stalkers, please find me on my new site
pollycooksandeats.com
Happy eating
I love food, I love clothes

Wednesday, August 13, 2014
Wednesday, April 2, 2014
The only kind of snowball anyone should be dealing with by now...
I grew up loving, I mean loving Hostess Snowballs. I love them so much, I prefer to eat them alone so I can really go at it. I recently introduced these little balls of indulgence to a good friend of mine and upon my absolute horror, said friend spit it out and said they were the grossest things ever.
To be honest, I get it. I understand why someone wouldn't enjoy these things... I mean I think most of what makes these things is synthetic and not technically even real food. I still enjoy them, go ahead and judge me, I do.
So I thought I would make a homemade snowball and see if I could sway my friend into enjoying this with me, here goes.
I started by make a chocolate genoise cake, this makes such a soft "sponge" I thought it would be perfect for how I was going to use it
Chocolate Genoise
1/2 stick unsalted butter
3/4 cup ap flour
1/4 cup cocoa
1/2 tsp salt
1 cup sugar
6 large eggs
1 tsp vanilla extract
Pre-heat oven to 350
Prepare 9 inch round pan (I usually just spray with Pam, liberally)
Melt the butter, set aside.
Sift the flour, cocoa, and salt into a big bowl
Whisk the eggs and the sugar in a kitchen aide until well combined. Then, place the bowl over a sauce pan of simmering water, making sure that the water does not touch the bowl. Now whisk constantly (this is a true labor of love...) until it is warm to the touch, remove from heat and let the kitchen aide do its magic and beat at medium speed until the eggs are pale colored, and full of volume. About 6-8 minutes.
Beat in the vanilla extract. Remove from mixer and take a hefty portion of the eggs (about 1 cup) and stir into the melted butter.
Then slowly sprinkle the flour mixture into the batter on slow just until incorporated. Add the melted butter/eggs back into the batter, gently folding it in. You don't want to take any of the volume out of the batter.
Pour gently into prepared pan and bake for about 35 minutes, it should bounce back when gently pressed with a finger. A clean finger preferably.
Once the cake has cooled in the pan, turn out and let cool to room temp. Then wrap up in saran wrap and let chill in the fridge for at least an hour.
Slice of the top of the cake where it is round and do not throw this away or eat it, you need it.
Then slice the cake into 4 (thin) layers, this is done best with a serrated knife and a turntable.
Take one of the cake rounds and cut it into 8 pieces like a pizza

Then line a 9 inch round bowl with saran wrap so that there are long edges of saran wrap hanging over the bowl. Place the triangle pieces all along the bowl. This can be a little bit of a bitch. Just keep in mind, you work the cake, don't let the cake work you. If there are some spaces in between, just use that top part of the cake I told you to keep and rip pieces of it and just press into any showing spaces so that the bowl is fully lined with the chocolate cake.
 See how the saran wrap hangs below the bowl? This will make getting out of the bowl super easy. Next take your favorite raspberry jam and liberally spread all over the cake, then put into the fridge.


Take some of that whipped cream and place some of it at the bottom of the cake lined bowl, then cut out a small circle from one of the 4 layers, I just did this by eye... I am sure you can do it as well, and place the small circle of cake on top of the whipped cream. Repeat till it is filled right up to the top.

Cover with saran wrap and let chill.
While it is chilling, make the marshmallow topping.
1/2 cup water
2 tsp unflavored gelatin
1 1/2 sticks of butter, at room temp
2 teaspoons vanilla extract
1/4 tsp salt
4 cups of Fluff
Dissolve the gelatin in a microwave safe bowl with the water until is soft. (at least 6 minutes)
Microwave the gelatin mixture until it is bubbling, this really varies on your microwave oven, for mine it took about 45 seconds. Stir in butter, vanilla and salt till combined. Once this has cooled till it is just warm to the touch, add the fluff, whisk until it is well mixed and no lumps of anything. This is a bitch, but hang in there, it will come together. Cover and let chill in fridge.
For the original snowballs, the coconut "substance" that is used is not toasted, but I thought that it could use some crunch. So I died some coconut pink (about 2 cups, just put coconut in a food processor add a couple drops of red food coloring and grind away)
 Once its the pink that you want, toast it. I did this by putting the pink coconut on a sheet pan and into a 400 degree oven till it got pretty toasty.
Now invert the cake onto a plate

Next, using a rubber spatula, mix up the marshmallow spread so that it is spreadable.
Then slather all of that marshmallow goodness all over the cake

Immediately cover with the toasted pink coconut
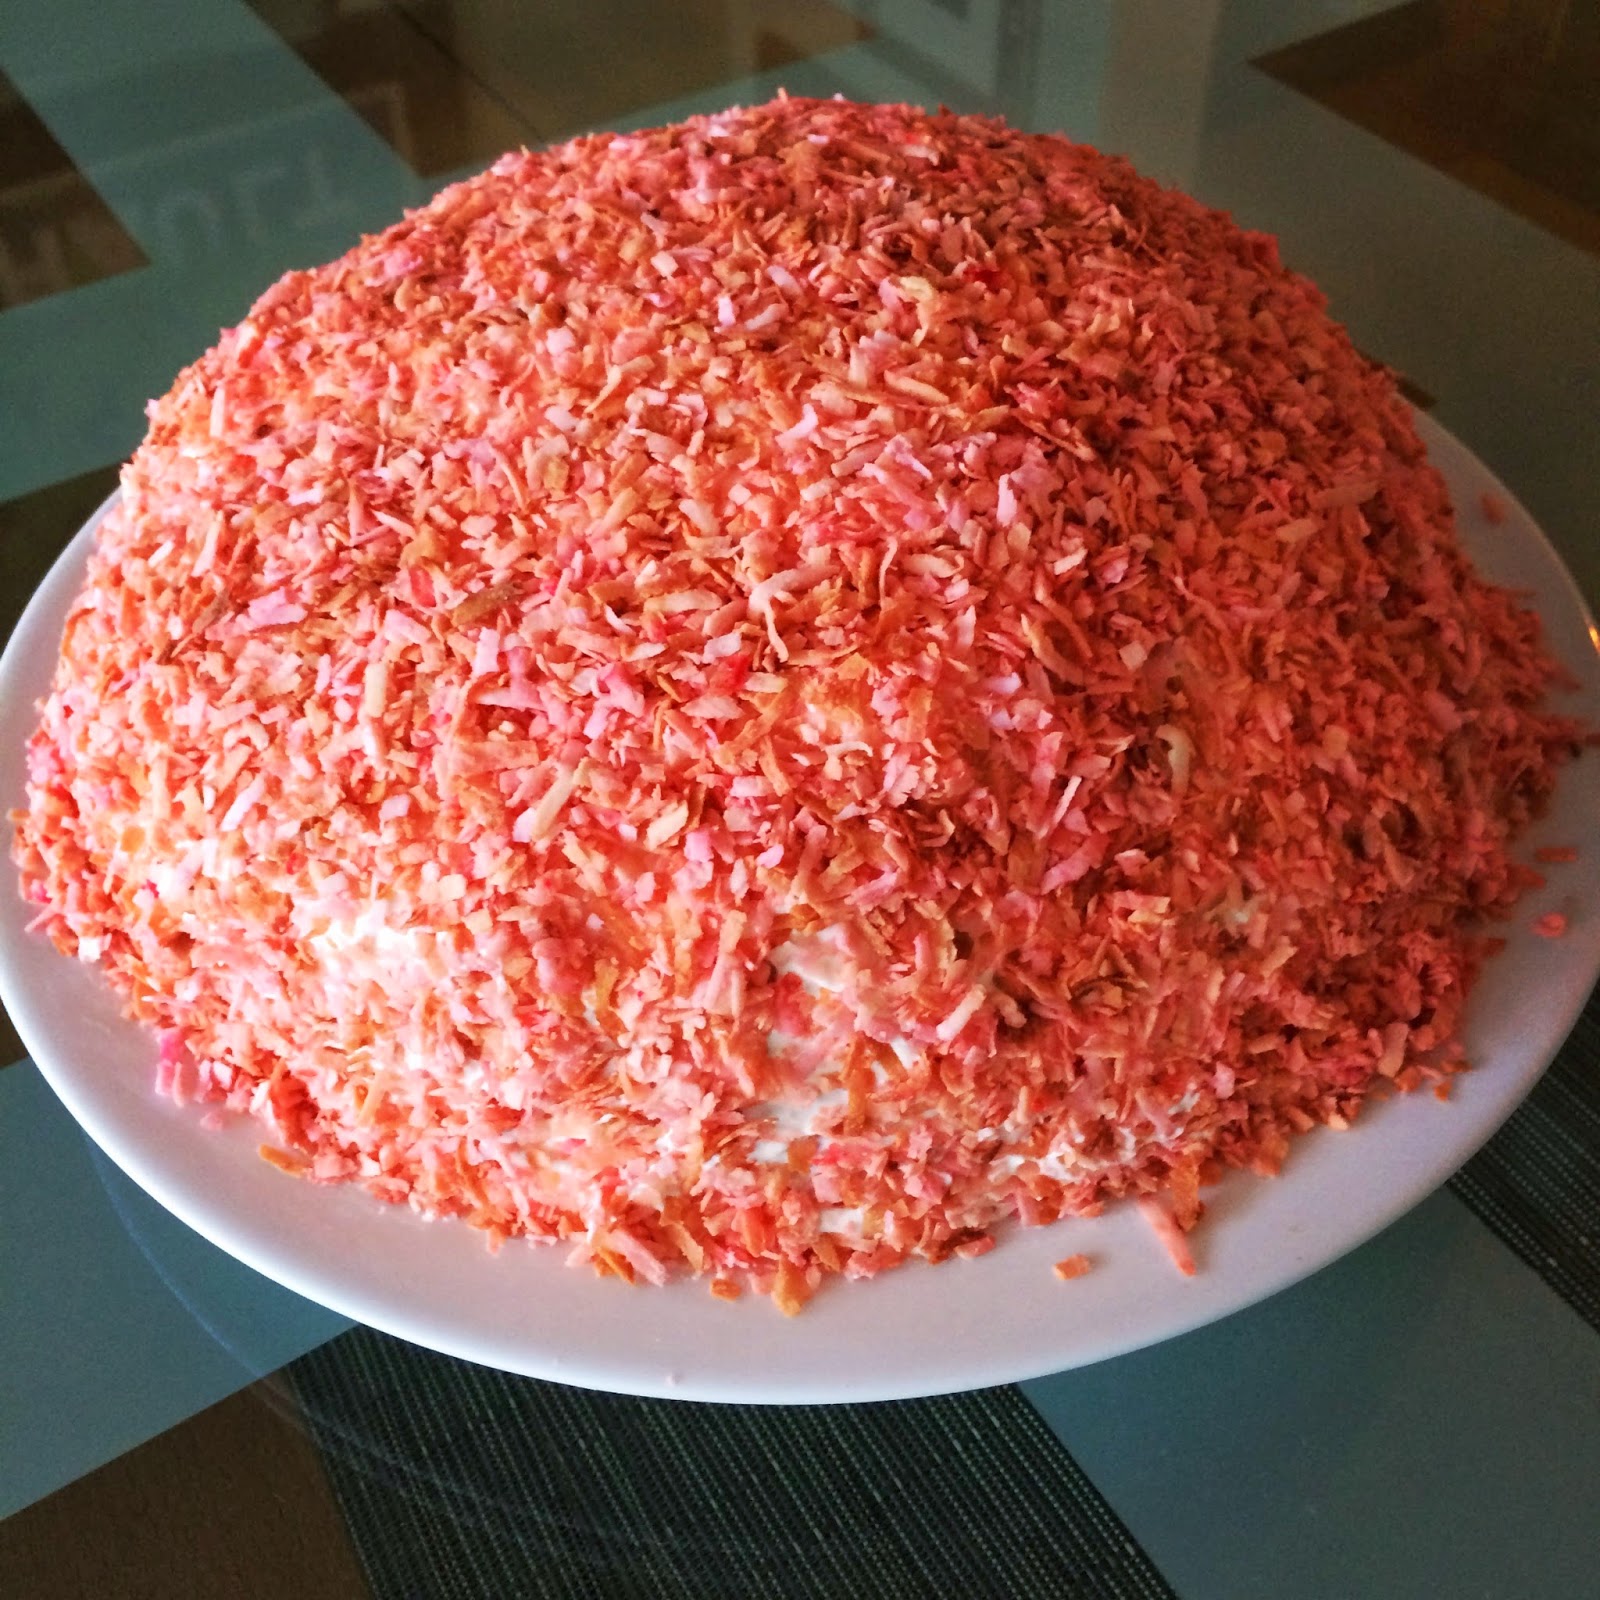
Call your bff over and enjoy this snowball and say good bye to winter.
Enough with the snow and cold already!

To be honest, I get it. I understand why someone wouldn't enjoy these things... I mean I think most of what makes these things is synthetic and not technically even real food. I still enjoy them, go ahead and judge me, I do.
So I thought I would make a homemade snowball and see if I could sway my friend into enjoying this with me, here goes.
I started by make a chocolate genoise cake, this makes such a soft "sponge" I thought it would be perfect for how I was going to use it
Chocolate Genoise
1/2 stick unsalted butter
3/4 cup ap flour
1/4 cup cocoa
1/2 tsp salt
1 cup sugar
6 large eggs
1 tsp vanilla extract
Pre-heat oven to 350
Prepare 9 inch round pan (I usually just spray with Pam, liberally)
Melt the butter, set aside.
Sift the flour, cocoa, and salt into a big bowl
Whisk the eggs and the sugar in a kitchen aide until well combined. Then, place the bowl over a sauce pan of simmering water, making sure that the water does not touch the bowl. Now whisk constantly (this is a true labor of love...) until it is warm to the touch, remove from heat and let the kitchen aide do its magic and beat at medium speed until the eggs are pale colored, and full of volume. About 6-8 minutes.
Beat in the vanilla extract. Remove from mixer and take a hefty portion of the eggs (about 1 cup) and stir into the melted butter.
Then slowly sprinkle the flour mixture into the batter on slow just until incorporated. Add the melted butter/eggs back into the batter, gently folding it in. You don't want to take any of the volume out of the batter.
Pour gently into prepared pan and bake for about 35 minutes, it should bounce back when gently pressed with a finger. A clean finger preferably.
Once the cake has cooled in the pan, turn out and let cool to room temp. Then wrap up in saran wrap and let chill in the fridge for at least an hour.
Slice of the top of the cake where it is round and do not throw this away or eat it, you need it.
Then slice the cake into 4 (thin) layers, this is done best with a serrated knife and a turntable.
Take one of the cake rounds and cut it into 8 pieces like a pizza
Then line a 9 inch round bowl with saran wrap so that there are long edges of saran wrap hanging over the bowl. Place the triangle pieces all along the bowl. This can be a little bit of a bitch. Just keep in mind, you work the cake, don't let the cake work you. If there are some spaces in between, just use that top part of the cake I told you to keep and rip pieces of it and just press into any showing spaces so that the bowl is fully lined with the chocolate cake.
See how the saran wrap hangs below the bowl? This will make getting out of the bowl super easy. Next take your favorite raspberry jam and liberally spread all over the cake, then put into the fridge.
While its chilling, take a pint of heavy cream, add 1 Tablespoon powdered sugar, 1/2 tsp vanilla bean paste (or scrape out the inside of a vanilla bean) and add 2 Tablespoons of Raspberry Kirsch and whip heavy cream up to stiff peaks.
Cover with saran wrap and let chill.
While it is chilling, make the marshmallow topping.
1/2 cup water
2 tsp unflavored gelatin
1 1/2 sticks of butter, at room temp
2 teaspoons vanilla extract
1/4 tsp salt
4 cups of Fluff
Dissolve the gelatin in a microwave safe bowl with the water until is soft. (at least 6 minutes)
Microwave the gelatin mixture until it is bubbling, this really varies on your microwave oven, for mine it took about 45 seconds. Stir in butter, vanilla and salt till combined. Once this has cooled till it is just warm to the touch, add the fluff, whisk until it is well mixed and no lumps of anything. This is a bitch, but hang in there, it will come together. Cover and let chill in fridge.
For the original snowballs, the coconut "substance" that is used is not toasted, but I thought that it could use some crunch. So I died some coconut pink (about 2 cups, just put coconut in a food processor add a couple drops of red food coloring and grind away)
Now invert the cake onto a plate
Next, using a rubber spatula, mix up the marshmallow spread so that it is spreadable.
Then slather all of that marshmallow goodness all over the cake
Immediately cover with the toasted pink coconut
Call your bff over and enjoy this snowball and say good bye to winter.
Enough with the snow and cold already!
Thursday, March 6, 2014
What's up yeast? Gangsta baking....
I love desserts with citrus, that sweet tang you can only get from fresh winter fruits go just splendidly into many, many, many desserts. Making them all very healthy for you.
I had some serious clementine action going on in my fruit drawer in my fridge so I wisely decided to shove them into some cinnamon rolls.
I will often bake for therapeutic reasons and my first instinct is to make a yeast based dough for the therapy I am seeking. Now, if for some reason, I manage to kill the yeast and my dough doesn't rise, it makes me go all gangsta and want to choke a bitch, negating any therapeutic baking I was seeking... But no worries, this all went just peachy.
For this recipe, I warmed up 3/4 cup of Buttermilk to 100 degrees F, (for me this means warming it up in my microwave for 15 seconds at time) Buttermilk looks grossly offensive once you do this, have a fork near by to whisk it back to none offensive looks. To that I added 1 packet of active dry yeast.
In another bowl, whisk together 3 eggs. In yet, another bowl, melt 6 Tablespoons of butter.
Add the butter to the eggs and to that add the zest of 4 Clementines.
To my kitchen aid bowl, I added 4 cups of flour, 1/4 cup of sugar and 1 and 1/4 tsp Salt, mix with the dough hook and pour in the yeast and buttermilk and then pour the egg mixture right in after that and let the kitchen aid do its magic, turning this mixture into a beautiful elastic, gluten filled dough. I love gluten and it has done nothing to offend me, go gluten yay!
IF, the dough seems sticky, add 1 Tablespoon of flour at time until the dough is slapping the bowl, (there is sooooo much I could say here...) I have found that it really is up to the pastry gods and one day you will need to add a bit more flour and other days, no need. Always safer to start with less flour cuz you can't take that shit out once it is in there.
Turn the dough out onto the counter and gently knead with your hands, just because at this point, it feels sooooo good.
Lightly oil a big bowl (I used vegetable oil) and place the dough into the bowl.
Wrap tight with saran wrap and leave in a warm draft free room. I did this on a freezing NYC day and turned my oven on, had the clothes dryer going and the living room heater up to full blast, just to be sure I wouldn't have to choke a bitch if this dough didn't step up and rise.


Once the dough is proofed properly, roll it out on a lightly floured surface. This can really be a bitch. And guess why? The gluten, it makes it really elastic and stretchy, but it feels so good to roll this dough out, go ahead, you know you want too... Don't worry your pretty little head about making a perfect rectangle to roll out, get the closest thing you can to a rectangle, it'll work out just fine.
Once it's rolled out to your best ability, which I am sure is just awesome, liberally spread some softened butter all over that dough. Because I am me, I use Plugra unsalted. Then sprinkle sugar all over the dough and then some cinnamon. I went light with the cinnamon and used some cardamom as well, it goes so good with citrus. Look at me being all fancy with the flavors. Next, as tightly as you can, roll it up tight lengthwise (I lived in South Africa so I can roll the stickiest of the icky up tight) Slice into rounds and place into a buttered dish and cover tightly with saran wrap. Leaving room for these beauties to rise, see above.
 Just look at all that beautiful life that was created with yeast, it really is amazing. Who would not want a part of this? Now it is off to the oven to bake at 375 degrees for about 20ish minutes. This is where I suck cuz I don't really use a timer, I go by my eyes. To me, this (see below) looks done. I like them to be a slightly darker color then what most people tend to think as done.
 While these beauties are in the oven, I made the Clementine cream cheese frosting. Because what the hell else did you think would top these beauties?
 The four food groups here...
Beat room temp 4 oz cream cheese along with room temp 4 oz butter. Add the juice and pulp of 4 -5 Clementines and 2 tsp vanilla, beat till light and fluffy. Add 4 cups powdered sugar, beat till well combined. I like to put this in the fridge and firm up a bit before I slather this crazy mad delicious frosting all over those baked beauties.
Once they have come out of the oven, I like to let them sit for just a few minutes before smothering with the clementine cream cheese icing.
OK, its been a few minutes, go for it. Lose all abandon, go full force. Cover every single part, twice, with that mad crazy delicious frosting.

Now, grab a plate, a fork if you wish and indulge. It's all part of this "therapeutic baking"

You're welcome.
No bitches were choked or harmed in anyway during the making of these bomb ass Clementine Cardamom Cinnamon rolls. Cuz I'm good
I had some serious clementine action going on in my fruit drawer in my fridge so I wisely decided to shove them into some cinnamon rolls.
I will often bake for therapeutic reasons and my first instinct is to make a yeast based dough for the therapy I am seeking. Now, if for some reason, I manage to kill the yeast and my dough doesn't rise, it makes me go all gangsta and want to choke a bitch, negating any therapeutic baking I was seeking... But no worries, this all went just peachy.
For this recipe, I warmed up 3/4 cup of Buttermilk to 100 degrees F, (for me this means warming it up in my microwave for 15 seconds at time) Buttermilk looks grossly offensive once you do this, have a fork near by to whisk it back to none offensive looks. To that I added 1 packet of active dry yeast.
In another bowl, whisk together 3 eggs. In yet, another bowl, melt 6 Tablespoons of butter.
Add the butter to the eggs and to that add the zest of 4 Clementines.
To my kitchen aid bowl, I added 4 cups of flour, 1/4 cup of sugar and 1 and 1/4 tsp Salt, mix with the dough hook and pour in the yeast and buttermilk and then pour the egg mixture right in after that and let the kitchen aid do its magic, turning this mixture into a beautiful elastic, gluten filled dough. I love gluten and it has done nothing to offend me, go gluten yay!
IF, the dough seems sticky, add 1 Tablespoon of flour at time until the dough is slapping the bowl, (there is sooooo much I could say here...) I have found that it really is up to the pastry gods and one day you will need to add a bit more flour and other days, no need. Always safer to start with less flour cuz you can't take that shit out once it is in there.
Turn the dough out onto the counter and gently knead with your hands, just because at this point, it feels sooooo good.
Lightly oil a big bowl (I used vegetable oil) and place the dough into the bowl.
Wrap tight with saran wrap and leave in a warm draft free room. I did this on a freezing NYC day and turned my oven on, had the clothes dryer going and the living room heater up to full blast, just to be sure I wouldn't have to choke a bitch if this dough didn't step up and rise.
Here it is, if you look closely, you can see the specks of Clementine zest in that beautiful gluten filled dough. This is where you have so much hope for this dough. And it's amazing, its a living thing.
And here, just a short 2 1/2 hours later, no bitches have to be choked and I am the proud creator of some beautifully proofed dough. "Proofed" is the technical word pro's use in the biz to describe when dough rises. And there really is a science to it. Look it up, it's neato.
Once it's rolled out to your best ability, which I am sure is just awesome, liberally spread some softened butter all over that dough. Because I am me, I use Plugra unsalted. Then sprinkle sugar all over the dough and then some cinnamon. I went light with the cinnamon and used some cardamom as well, it goes so good with citrus. Look at me being all fancy with the flavors. Next, as tightly as you can, roll it up tight lengthwise (I lived in South Africa so I can roll the stickiest of the icky up tight) Slice into rounds and place into a buttered dish and cover tightly with saran wrap. Leaving room for these beauties to rise, see above.
Beat room temp 4 oz cream cheese along with room temp 4 oz butter. Add the juice and pulp of 4 -5 Clementines and 2 tsp vanilla, beat till light and fluffy. Add 4 cups powdered sugar, beat till well combined. I like to put this in the fridge and firm up a bit before I slather this crazy mad delicious frosting all over those baked beauties.
Once they have come out of the oven, I like to let them sit for just a few minutes before smothering with the clementine cream cheese icing.
OK, its been a few minutes, go for it. Lose all abandon, go full force. Cover every single part, twice, with that mad crazy delicious frosting.
Now, grab a plate, a fork if you wish and indulge. It's all part of this "therapeutic baking"
You're welcome.
No bitches were choked or harmed in anyway during the making of these bomb ass Clementine Cardamom Cinnamon rolls. Cuz I'm good
Monday, October 14, 2013
What should you do with all those apples you got apple picking? Make bread pudding, of course
I've said it before and I'll say it again (just do us both a favor and pretend its the first time you've heard me say this) I love fall. I just love it, reasons to layer up with sweaters, buy new sweaters, buy new boots. I still think the old "back-to-school" clothes shopping still applies to me...
With fall, comes the annual trek for New Yorker's to head to the "country" otherwise known as the suburbs (with no more then a maximum of 1 hour drive away) and pick this seasons harvest.
Don't get me wrong, I do enjoy the drive and the very small escape out of the city, even if just for the day, true story.
Once home with the bags and bags of apples, the usual is apple pie, apple cake, rustic apple galettes, and I was just recently told that I need to try putting freshly diced up honey crisp apples into vanilla flavored greek yogurt, this is, of course, super high on my list of things to try.....
This year I wanted to make a little something different. So I made a Maple, Apple, Cranberry bread pudding. I served it with salted caramel sauce and spiced whipped cream. Because everything should use a little salted caramel sauce and spiced whipped cream. Spiced whipped cream shouldn't scare you, I'm not putting any spicy flavors into it, all I do is add 2 Tablespoons of whole cloves and 1 tsp of Allspice into 1 cup Heavy cream, I let this sit in the fridge over night. The next day I strain it and then whip it up to med-soft peaks. There you have it spiced whipped cream*

Maple, Apple, Cranberry Bread Pudding
Bake bread pudding until puffed and cracked on top, apples are deep brown, and instant-read thermometer inserted into center of pudding registers 170°F to 180°F, about 1 hour 30 minutes (pudding will rise high above top of pan). Remove from oven and let rest at room temperature 45 minutes to 1 hour (pudding will fall). Brush apples on top of pudding with additional maple syrup. Spoon pudding into bowls and serve warm, room temp or cold, whatever suits you best, this is your bread pudding. Scoop on a generous portion of the clove spice scented whip cream on top, or on the side and enjoy.

With fall, comes the annual trek for New Yorker's to head to the "country" otherwise known as the suburbs (with no more then a maximum of 1 hour drive away) and pick this seasons harvest.
Don't get me wrong, I do enjoy the drive and the very small escape out of the city, even if just for the day, true story.
Once home with the bags and bags of apples, the usual is apple pie, apple cake, rustic apple galettes, and I was just recently told that I need to try putting freshly diced up honey crisp apples into vanilla flavored greek yogurt, this is, of course, super high on my list of things to try.....
This year I wanted to make a little something different. So I made a Maple, Apple, Cranberry bread pudding. I served it with salted caramel sauce and spiced whipped cream. Because everything should use a little salted caramel sauce and spiced whipped cream. Spiced whipped cream shouldn't scare you, I'm not putting any spicy flavors into it, all I do is add 2 Tablespoons of whole cloves and 1 tsp of Allspice into 1 cup Heavy cream, I let this sit in the fridge over night. The next day I strain it and then whip it up to med-soft peaks. There you have it spiced whipped cream*
Maple, Apple, Cranberry Bread Pudding
- 6 large eggs
- 1/2 cup pure maple syrup (preferably Grade B) It gives more flavor when baking
- 1/2 cup (packed) dark brown sugar
- 1 tablespoon vanilla extract
- 2 teaspoons ground cinnamon
- 1/2 teaspoon fine sea salt
- 1 cup whole milk
- 1 cup heavy whipping cream
- 2 tablespoons apple brandy (such as applejack or Calvados)
- 1 cup cranberries
- 1 1-pound loaf Brioche bread cut into 3/4- to 1-inch cubes (6 1/2 to 7 cups)* Let sit out over night and dry out.
*I used Brioche, and I left the crust on, I think it gives more texture to the bread pudding
- 3 tablespoons unsalted butter
- 1 1/4 pounds Granny Smith apples (about 3), peeled, quartered, cored, cut into 1/3-inch-thick slices (about 7 cups)
- 1 1/4 pounds Honey crisp apples (about 3), peeled, quartered, cored, cut into 1/3-inch-thick, once all cut, combine apples together
- 1/4 cup pure maple syrup plus additional for brushing (preferably Grade B)
- 1/4 cup (packed) dark brown sugar
- Whisk eggs, maple syrup, brown sugar, vanilla, cinnamon, and sea salt in large bowl. Add milk, cream, and brandy and whisk until well blended. Strain through a fine mesh strainer and then add bread cubes and cranberries and press to submerge into custard. Let soak at least 30 minutes, occasionally pressing on bread cubes to submerge.
Meanwhile, position rack in bottom third of oven and preheat to 350°F. Generously butter 9 X 13 glass or ceramic loaf pan (you want something good and thick so the bread pudding cooks better)
Melt 3 tablespoons butter in large nonstick skillet over medium-high heat. Add apple slices and sauté until deep golden and beginning to soften, stirring and turning apple slices frequently, 10 to 12 minutes. Stir in 1/4 cup maple syrup, then brown sugar. Simmer until sugar dissolves and mixture thickens to syrup, about 1 minute. Remove from heat and let cool.
Mix half of apple slices into bread-custard mixture. Transfer bread pudding mixture to prepared pan. Arrange remaining apple slices atop bread pudding however suits you best. Spoon any remaining syrup from skillet over apple slices.
Salted Caramel Sauce
1 cup sugar
1/2 cup water
1 cup Heavy cream
1 tsp sea salt
Pour sugar into sauce pan, pour water and do not pour, let come to a boil on a med-high heat, once it starts to boil, lower the heat and look for the sugar to turn a dark amber color, once it does, remove from heat. Carefully add the heavy cream, it will bubble and steam so stand back. Stir till combined, if it hasn't come together, put back on the heat and stir till well combined. Pour into a bowl and let cool stirring occasionally. Once cooled, sprinkle in salt and stir. Thursday, October 10, 2013
Mmmmmmmmm-go
Now that summer already feels like a distant memory, it's time for me to get back into the kitchen and bake.
Fall and Winter seem to really get all the really yummy baked goodies, when it's cold outside or hell, even just a little windy, I can hear my kitchen calling to come and make some yummy munchies.
And what's better then some yummy homemade goodies? Hunkering down inside your warm cozy living space and watching some movies while you eat said goodies.
So now, go check me out here on M-Go;
www.mgo.com/dinner/
Sunday, April 14, 2013
Slutty Barbie cakes, takes one to make one...
Barbie cakes are by far my best sellers. This week, one of the cakes I made was for a 39th birthday party and the birthday girl wanted one of my slutty Barbie cakes. I keep saying that it takes one to make one... So glad that there are people out there with a sense of humor and realize that I am kidding.


Kind of.
The rest of you that send me perverted messages via any social media websites, well keep 'em coming.
Here is the $9.00 Barbie that I use for most of my Barbie cakes. She looks so happy, no clue as to the transformation she is about to go through....
I don't care for the doll's that are made specifically for said Barbie cakes, they look like a serial killer somewhere is out there is designing doll's for some twisted purpose... And why are they looking off to the left? What in the hell is going on over there?
So for my use, I buy a whole Barbie, then rip off one of her legs. Poor thing. She looks like she survived some civil war between toys once you cut into the cake. But all in the name of a Happy Birthday, anything goes. Just ask Salome. *
I use the standard Barbie cake pan but I also bake an extra 8 inch round to add more layers to the "dress" of the cake. I sometimes also bake a 10 inch round to place the Barbie on for a base. This works just in case the birthday gal or guy, this is 2013, needs to place several, several candles on said cake....
So here she is, looking like she is being tortured in keeping her arms up for a lengthy amount of time by some crazy dictator. The cake and frosting are alternating layers of vanilla and chocolate. Once I have her crumb coated, I then go over with the base color for the cake. In this case, black.
I put her hair up to keep it from getting onto the cake while I decorate her. Any hair from anywhere on food repulses me.
What I think is just nifty about my cakes (excuse me while I toot my own horn here) I have figured out a way to paint on frosting the same way you can paint on royal icing and or fondant. All the decorations on my cakes, including this one, is all frosting. Yummy, you want to drag your finger through it cuz it looks sooooo good frosting. Grab a diet coke and a fork and let the birthday celebration begin.
*I was raised (very much against my will) Jehovah Witness. I knew from a very early age that this was not going to work out for me. Jehovah Witnesses don't believe in celebrating any holidays whatsoever. This includes birthdays, I remember even the word birthday was treated as a profanity.
Hi, have you read this blog? Clearly I wasn't going to last in this.
Every time I asked an elder (an older "wiser" member of this organization) why we couldn't celebrate birthdays, they always referred to the story in the bible of the girl, Salome. Who, for her birthday wanted and got John the Baptist's head on a platter. My response to this ass backwards reasoning, was that I didn't want a head on a platter, just some cake and a few presents. Gosh.
Wednesday, March 6, 2013
A slightly twisted introduction to peanut butter
I have a love in my life that does not like peanut butter, which just confuses me, because if I like it, everyone around me should like it, correct? (For anyone reading this that is new to me, it's all about me and I tend to lose focus and get confused when its not about me)
So I felt I needed to make something that would entice this special person to fall in love with peanut butter. I came up with chocolate peanut butter banana cake bars. Not the purest way to have peanut butter but if I can find ways to add more sugar and fat to the creations that I am making and it makes sense, I go for it.
I started with making a banana cake, rather then banana bread, banana cake would be a lighter vehicle to getting the peanut butter and chocolate into my loved ones gullet.
 Banana Cake
2 1/4 cups cake flour
3/4 teaspoon baking soda
1/2 teaspoon baking powder
1 cup mashed ripe bananas (2 large bananas)
1/4 cup whole milk
3 Tablespoons sour cream
1 teaspoon vanilla extract plus 1 Tablespoon vanilla extract
1/2 cup unsalted butter at room temp
1 1/3 cups sugar
2 large eggs
1 cup semi-sweet chocolate chips
Preheat oven 350 degrees spray 8 x 11 pan with Pam
Sift together cake flour, baking soda, baking powder, and 1/2 tsp salt in a medium bowl.
Mix mashed bananas, milk, sour cream, and 1 teaspoon Vanilla extract.
Using an electric mixer beat butter and sugar until its light and fluffy like a cloud. Add eggs 1 at a time mixing well after each one. Add dry ingredients alternately with banana mixture in 3 additions, mix just until blended after each addition.
Pour into prepared pan and bake 20-30 minutes, till tester inserted comes out with just a few crumbs attached. Soon as you bring the cake out, sprinkle the top with semi-sweet chocolate chips and let melt, then spread over all of the top of the cake.
Cover the top of the pan with aluminum foil and chill in fridge for at least 2 hours. Trust me, it just works and taste better if you do this.
Next, make a ganache by bringing to a boil, 1 cup of heavy cream and pour into a bowl that has 1 cup semi-sweet chocolate chips. Cover tightly and let sit for about 5 minutes. Whisk together till very well blended, place saran wrap directly on top of the ganache and let cool. Just look how luscious...

Now for the "peanut butter" the best part really, this is something that I could just go for and eat the entire bowl, go ahead and judge me, I do.
1 cup creamy peanut butter (I prefer a natural peanut butter, but you do you and use what you like. You'll be wrong, but go ahead)
1 cup unsalted butter
1 teaspoon vanilla extract
2 Tablespoons Honey
4 cups powdered sugar
Cream the butter and peanut butter so much that it turns lighter in color, just let it go. Add vanilla and honey and mix well. Add powdered sugar and mix well, again, just let it go.
Grab a clean spoon, dig into the "peanut butter" and make sweet love down by the fire, awe yeah. (Just be mindful to save some for the finished product...)

Take the banana cake out of the pan and cut in half on the horizontal, put the half of the cake that has the chocolate on top back into the pan with the chocolate side up. Like this;

Then spread the peanut butter on top of the cake, like this;
 Can you even deal? Cuz I can't, I'm thinking I should make these bad boys again, STAT.
(STAT means now)

Next, place the other half of the cake on top of the peanut butter then slather that up in that velvety ganache, is this not the best way to get someone to love peanut butter? What a joke, this is the only way to go.


 See all those yummy layers? But wait! Not finished till you slather all of that ganache all over the top. Clearly it's not finished with out the ganache.... You can see that, correct?
 Awe yeah, the finished "peanut butter" product, you know you want this, in your mouth....
So I felt I needed to make something that would entice this special person to fall in love with peanut butter. I came up with chocolate peanut butter banana cake bars. Not the purest way to have peanut butter but if I can find ways to add more sugar and fat to the creations that I am making and it makes sense, I go for it.
I started with making a banana cake, rather then banana bread, banana cake would be a lighter vehicle to getting the peanut butter and chocolate into my loved ones gullet.
2 1/4 cups cake flour
3/4 teaspoon baking soda
1/2 teaspoon baking powder
1 cup mashed ripe bananas (2 large bananas)
1/4 cup whole milk
3 Tablespoons sour cream
1 teaspoon vanilla extract plus 1 Tablespoon vanilla extract
1/2 cup unsalted butter at room temp
1 1/3 cups sugar
2 large eggs
1 cup semi-sweet chocolate chips
Preheat oven 350 degrees spray 8 x 11 pan with Pam
Sift together cake flour, baking soda, baking powder, and 1/2 tsp salt in a medium bowl.
Mix mashed bananas, milk, sour cream, and 1 teaspoon Vanilla extract.
Using an electric mixer beat butter and sugar until its light and fluffy like a cloud. Add eggs 1 at a time mixing well after each one. Add dry ingredients alternately with banana mixture in 3 additions, mix just until blended after each addition.
Pour into prepared pan and bake 20-30 minutes, till tester inserted comes out with just a few crumbs attached. Soon as you bring the cake out, sprinkle the top with semi-sweet chocolate chips and let melt, then spread over all of the top of the cake.
Cover the top of the pan with aluminum foil and chill in fridge for at least 2 hours. Trust me, it just works and taste better if you do this.
Next, make a ganache by bringing to a boil, 1 cup of heavy cream and pour into a bowl that has 1 cup semi-sweet chocolate chips. Cover tightly and let sit for about 5 minutes. Whisk together till very well blended, place saran wrap directly on top of the ganache and let cool. Just look how luscious...
Now for the "peanut butter" the best part really, this is something that I could just go for and eat the entire bowl, go ahead and judge me, I do.
1 cup creamy peanut butter (I prefer a natural peanut butter, but you do you and use what you like. You'll be wrong, but go ahead)
1 cup unsalted butter
1 teaspoon vanilla extract
2 Tablespoons Honey
4 cups powdered sugar
Cream the butter and peanut butter so much that it turns lighter in color, just let it go. Add vanilla and honey and mix well. Add powdered sugar and mix well, again, just let it go.
Grab a clean spoon, dig into the "peanut butter" and make sweet love down by the fire, awe yeah. (Just be mindful to save some for the finished product...)
Take the banana cake out of the pan and cut in half on the horizontal, put the half of the cake that has the chocolate on top back into the pan with the chocolate side up. Like this;
Then spread the peanut butter on top of the cake, like this;
(STAT means now)
Next, place the other half of the cake on top of the peanut butter then slather that up in that velvety ganache, is this not the best way to get someone to love peanut butter? What a joke, this is the only way to go.
Subscribe to:
Comments (Atom)